Tutorial to Set up a Configurable Outdoor Stir Fry Stove.
How to Set up Your PowerFlamer Configurable (Home and Camping) Outdoor Stir Fry StovePDF version
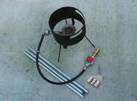
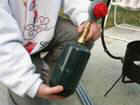
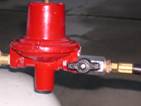
Setting up the outdoor stir fry stove is quick and easy. However, EXERCISE EXTREME CAUTION and apply common sense — you are dealing with fire here. Treat your outdoor stir fry stove the same way as you would your gas-powered barbeque grill. Following picture shows terminology used by the setup procedure.
1.
The stove should come with a wind ring guard, a burner mounted on the wind guard, and a hose with its orifice end already screwed into the burner.On the other end of the hose is a propane regulator with an adjustable red cap and a hex fitting with a propane bottle adaptor which will screw into a propane bottle (not included). If you have purchased the long-legged version, the package will include three (3) aluminum tubes and their adaptors.
2.
(Long-legged version only; skip this step for the short-legged version) If the adaptors come separately (not yet screwed onto each long leg tube), slide each adaptor to a long leg aluminum tube, and tighten the adaptor against the tube using a screw driver.
3.
(Long-legged version only; skip this step for the short-legged version) Slide an adaptor (already on an aluminum tube) into each short leg of the stove, and tighten the other screw on the adaptor so that the stove is upright and stable.
4.
Clear the area free of anything that can easily burn or obstruct your cooking. Set the propane gas tank/bottle at least two feet (or 0.7m) away from the stove.The propane tank/bottle (any size, including the camping size) and lighter can be purchased separately from hardware stores, gas stations, or grocery stores.
5.
(Steps 4 – 11 are for camping stove setup which connects to a camping throwaway bottle.For home stove setup which connects to a 20lbs propane tank, please proceed to step 12.)
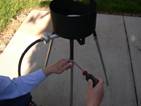
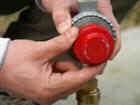
Important! Before connecting to a propane bottle, make sure:
·The red regulator is fully close by turning it counter-clockwise completely;
·The bottle adaptor is tightly connected to the hex fitting from the red regulator by screwing the adaptor counter-clockwise against the hex fitting (see next picture).
6.
Bring together the bottle adaptor end of the regulator from the stove to the propane bottle.Make sure that the adaptor can reach the bottle.
7.
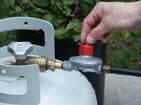
Slowly screw the bottle counter-clockwise into the adaptor.The propane gas should start to fill the adaptor up to the regulator.Your hand holding the adaptor should feel cool by expansion of the gas inside.
Caution!If you hear a continuous hissing sound at this moment, it indicates a leak.Unscrew the bottle.Check the tightness between the bottler adaptor and the hex fitting.Also the red regulator should be fully turned off.
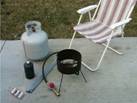
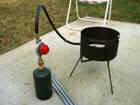
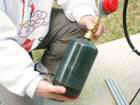
8.
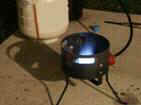
The table stove with a propane bottle connected should look like the one in the right picture.
9.
Open the regulator valve (turn clockwise as viewed from above) — slowly. You should now hear a low “hissing” sound (gas flowing out) from the stove’s burner outlet.
10.
Make sure that the two flame ventilation windows on the stove wind guard are facing away from you.
Use a long-neck lighter (not included) to light the propane — again, approach the stove slowly and carefully.Never stick out you head over the stove when lighting the flame!
11.
If you purchase our adaptor for flat bottom cookware, place the adaptor on top of the wind ring guard before lighting up the stove.
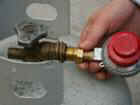
12.
When you are done with cooking, return the red regulator counter-clockwise to its off position.
13.
Unscrew the propane bottle from the adaptor by holding the adaptor (to prevent accidentally turning the adaptor away from the hex fitting from the regulator).
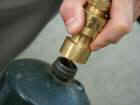
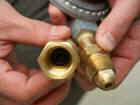
14.
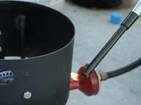
(Steps 12 through 21 are for home stove setup which connects to a regular 20lbs propane tank.)Before connecting to the propane tank, detach the bottle adaptor from the hex fitting.Turn the adaptor against the hex fitting clockwise.
15.
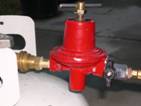
With the adaptor detached, both the adaptor and the hex fitting look like shown in the right picture.The hex fitting is ready to be connected to a 20 lbs propane tank.
16.
With the red regulator tightly in its close (off) position, screw the fitting counter-clockwise to the propane tank’s connector.
17.
Important! Before open the propane valve, turn the red cap regulator counter-clockwise fully to shut off the regulator.
Open the propane valve (turn counter-clockwise as viewed from above) – slowly, for about one turn (360 degrees).
Caution!If you hear hissing sound during this step, it indicates there is a gas leak.Return the propane tank valve to its off position and make sure the hex fitting is tightly connected to the tank and the regulator is in its off position.
18.
The higher power stoves (130BTU/Hr series) have an additional valve (level beside the regulator) that needs to be turned on.Partially turning this valve on can also adjust the power delivered to the stove, while the maximum power can be set by the level on top of the regulator (red).
19.
Open the regulator valve (turn clockwise as viewed from above) — slowly. You should now hear a low “hissing” sound (gas flowing out) from the stove’s burner outlet.
20.
Important! Make sure that the two flame ventilation windows on the stove wind guard are facing away from you.
Use a long-neck lighter (not included) to light the propane — again, approach the stove slowly and carefully.Never stick out you head over the stove when lighting the flame!
21.
If you purchase our adaptor for flat bottom cookware, place the adaptor on top of the wind ring guard before lighting up the stove.
22.
Once the flame is lit, adjust the intensity using the (red) regulator cap.The more ON (clockwise), the higher power output of the stove.Do not use the propane tank’s valve for controlling the intensity of the flame.
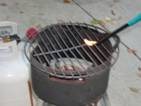
23.
The bluish flame can be difficult to see during day light, but it produces intense heat for your quick and healthy cooking!
Caution — during cooking:
·Stay away from the two ventilation windows to avoid the intense and hot (yet invisible during day light) flames;
·Do not touch the wind guard with bare hands because it may become extremely hot.
24.
Note: If your stove flame is not blue (for example mixed with yellowish flame) or stove low power setting flame is not stable (dies out), adjust the orifice air shutter (refer to the terminology picture on page 1) for a better fuel/air mixture.
25.
To turn off the stove after use, first turn off (clockwise) the propane tank’s valve, then turn off the regulator (shut off the valve besides the regulator for the 130kBTU/Hr stove like the picture on the right if there is a shut off valve after the regulator). Disconnect (unscrew) the hose from the propane tank if you like to store away the stove.